using System.Windows.Forms;
using System.Drawing;

class WinMain : Form {
	public static void Main(string[] args) {
		Application.Run(new WinMain());
	}
	override protected void OnPaint(PaintEventArgs e) {
		Graphics g = e.Graphics;
		g.FillEllipse(
			new SolidBrush(Color.FromArgb(0xAA , 0xAA , 0xFF)) ,
			10 , 10 , 200 , 100
		);
	}
}

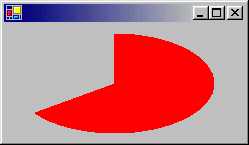
public void FillPie(
	Brush brush , Rectangle rect ,
	float startAngle , float sweepAngle
);
public void FillPie(
	Brush brush ,
	int x , int y , int width , int height ,
	int startAngle , int sweepAngle
);
public void FillPie(
	Brush brush ,
	float x , float y , float width , float height ,
	float startAngle , float sweepAngle
);
brush には塗りつぶしに使うの Brush オブジェクトを指定します
using System.Windows.Forms;
using System.Drawing;

class WinMain : Form {
	public static void Main(string[] args) {
		Application.Run(new WinMain());
	}
	override protected void OnPaint(PaintEventArgs e) {
		Graphics g = e.Graphics;
		g.FillPie(
			new SolidBrush(Color.FromArgb(0xFF , 0 , 0)) ,
			10 , 10 , 200 , 100 , -90 , 250
		);
	}
}
using System.Windows.Forms;
using System.Drawing;
class WinMain : Form {
public static void Main(string[] args) {
Application.Run(new WinMain());
}
override protected void OnPaint(PaintEventArgs e) {
Graphics g = e.Graphics;
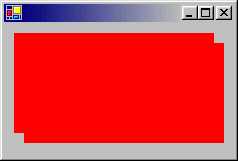
Rectangle[] rect = {
new Rectangle(10 , 10 , 200 , 100) ,
new Rectangle(20 , 20 , 200 , 100)
};
g.FillRectangles(new SolidBrush(Color.FromArgb(0xFF , 0 , 0)) , rect);
}
}
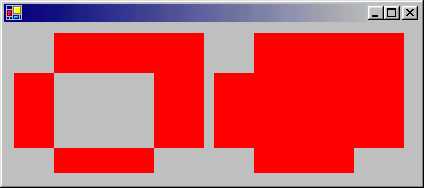
| メンバ | 解説 |
|---|---|
| Alternate | これは多角形の内部で隣接しない部分を塗りつぶす 他の境界線と交差している内面は塗りつぶされない デフォルトです |
| Winding | 交差する線の方向が逆の場合は塗りつぶされない |
using System.Windows.Forms;
using System.Drawing;
using System.Drawing.Drawing2D;

class WinMain : Form {
	public static void Main(string[] args) {
		Application.Run(new WinMain());
	}
	override protected void OnPaint(PaintEventArgs e) {
		Graphics g = e.Graphics;
		Point[] pt = {
			new Point(10 , 50) , new Point(150 , 50) ,
			new Point(150 , 150) , new Point(50 , 150) ,
			new Point(50 , 10) , new Point(200 , 10) ,
			new Point(200 , 125) , new Point(10 , 125)
		};
		g.FillPolygon(new SolidBrush(Color.FromArgb(0xFF , 0 , 0)) , pt);

		for (int i = 0 ; i < pt.Length ; i++) pt[i].X += 200;
		g.FillPolygon(
			new SolidBrush(Color.FromArgb(0xFF , 0 , 0)) ,
			pt , FillMode.Winding
		);
	}
}
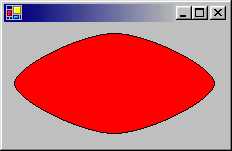
public void FillClosedCurve(Brush brush , Point[] points);
public void FillClosedCurve(Brush brush , PointF[] points);

public void FillClosedCurve(
	Brush brush , Point[] points ,
	FillMode fillmode
);
public void FillClosedCurve(
	Brush brush , PointF[] points ,
	FillMode fillmode
);
public void FillClosedCurve(
	Brush brush , Point[] points,
	FillMode fillmode , float tension
);
public void FillClosedCurve(
	Brush brush , PointF[] points ,
	FillMode fillmode , float tension
);
brush には塗りつぶしに用いる Brush オブジェクトを
public void DrawClosedCurve(Pen pen , Point[] points);
public void DrawClosedCurve(Pen pen , PointF[] points);

public void DrawClosedCurve(
	Pen pen , Point[] points ,
	float tension , FillMode fillmode
);
public void DrawClosedCurve(
	Pen pen , PointF[] points ,
	float tension , FillMode fillmode
);
pen には輪郭の描画に用いる Pen オブジェクトを
using System.Windows.Forms;
using System.Drawing;

class WinMain : Form {
	public static void Main(string[] args) {
		Application.Run(new WinMain());
	}
	override protected void OnPaint(PaintEventArgs e) {
		Graphics g = e.Graphics;
		Point[] pt = {
			new Point(10 , 60) , new Point(110 , 10) ,
			new Point(210 , 60) , new Point(110 , 110)
		};
		Brush myBrush = new SolidBrush(Color.FromArgb(0xFF , 0 , 0));
		Pen myPen = new Pen(Color.FromArgb(0 , 0 , 0));

		g.FillClosedCurve(myBrush , pt);
		g.DrawClosedCurve(myPen , pt);
	}
}