ボタン
様々なボタンの機能
GUI アプリケーションにおいて、ボタンは最も基本的なコントロールであり
ユーザーから見ても、最も直感的な操作が可能なインターフェイスでしょう
今回は、このボタンをウィンドウに付け、より高度な UI 開発技術を身につけます
.NET では System.Windows.Forms.ButtonBase 抽象クラスで
ボタンが持つべきであると思われる基本的なビヘイビアを宣言しています
System.Object
   System.MarshalByRefObject
      System.ComponentModel.Component
         System.Windows.Forms.Control
            System.Windows.Forms.ButtonBase

public abstract class ButtonBase : Control
コントロール設計者は、ボタンを作成する時はこのクラスを拡張するべきです
これによって、クラス利用者はボタンの概観や内部の機能に問わず
基本的なボタンの挙動を ButtonBase クラスのメンバを使って制御することができます
もちろん .NET のボタンも ButtonBase クラスを継承しています
最も一般的なボタンは System.Windows.Forms.Button でしょう
System.Object
   System.MarshalByRefObject
      System.ComponentModel.Component
         System.Windows.Forms.Control
            System.Windows.Forms.ButtonBase
               System.Windows.Forms.Button

public class Button : ButtonBase, IButtonControl
このクラスのコンストラクタはデフォルトコンストラクタのみです
ボタンに表示する文字列は、Contorl.Text プロパティで設定することができます
using System.Windows.Forms;
using System.Drawing;

class WinMain : Form {
	public static void Main(string[] args) {
		Application.Run(new WinMain());
	}

	public WinMain() {
		Button bt = new Button();
		bt.Text = "Kitty on your lap";
		bt.Bounds = new Rectangle(0 , 0 , 200, 50);
		Controls.Add(bt);
	}
}
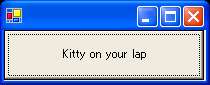
このプログラムは、クライアント領域に通常のボタンを追加しています
ボタンは 200 × 50 の大きさで、Text プロパティを用いてボタンのテキストを設定しています
実は、ボタンといっても説明するのはこのくらいしかありません
Button クラスもまた Control クラスを継承しているので、基本的な挙動の全ては
Control クラスから継承されるか、ButtonBase でオーバーライドしているくらいです
そのため、概観やイベントなどは Control クラスのプロパティでほとんど設定できます
しかし、いくつのかのボタンに特化したプロパティが追加されているので、これを紹介します
ボタンにイメージを要求するには ButtonBase.Image プロパティを使います
public Image Image {get; set;}
このプロパティは、ボタンに表示するイメージを設定したり、取得することができます
デフォルトでは null ですが、イメージをボタンに貼り付けることができます
イメージの位置は ButtonBase.ImageAlign プロパティで設定します
public ContentAlignment ImageAlign {get; set;}
このプロパティは、イメージの配置方法を示す列挙型のメンバ値を示します
これは、System.Drawing.ContentAlignment 列挙型です
[Serializable]
public enum ContentAlignment
この列挙型のメンバは、次のように定義されています
| メンバ | 解説
|
|---|
| BottomCenter | コンテンツは下部では垂直に、中央では平行に配置されます
|
| BottomLeft | コンテンツは下部では垂直に、左側では平行に配置されます
|
| BottomRight | コンテンツは下部では垂直に、右側では平行に配置されます
|
| MiddleCenter | コンテンツは中段では垂直に、中央では平行に配置されます
|
| MiddleLeft | コンテンツは中段では垂直に、左側では平行に配置されます
|
| MiddleRight | コンテンツは中段では垂直に、右側では平行に配置されます
|
| TopCenter | コンテンツは上部では垂直に、中央では平行に配置されます
|
| TopLeft | コンテンツは上部では垂直に、左側では平行に配置されます
|
| TopRight | コンテンツは上部では垂直に、右側では平行に配置されます
|
ButtonBase クラスのデフォルトは MiddleCenter に設定されています
必要に応じて変更してください
using System.Windows.Forms;
using System.Drawing;

class WinMain : Form {
	public static void Main(string[] args) {
		Application.Run(new WinMain());
	}

	public WinMain() {
		Button bt = new Button();
		bt.Image = new Bitmap("test.jpg");
		bt.Bounds = new Rectangle(0 , 0 , 400, 200);
		bt.MouseUp += new MouseEventHandler(OnButton);
		Controls.Add(bt);
	}
	public void OnButton(object sender , MouseEventArgs e) {
		MessageBox.Show("Kitty on your lap");
	}
}
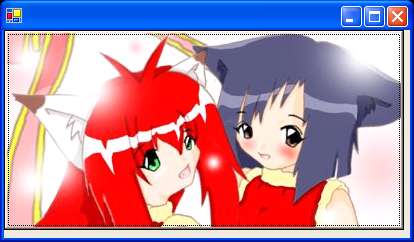
このプログラムでは、イメージを表示する大きなボタンを表示しています
さらに、ボタンを押すとメッセージボックスを表示するイベントも追加してみました
同様に、イメージの追加にイメージリストを使うことも可能です
イメージリストの追加は ButtonBase.ImageList プロパティで
インデックスの指定は ButtonBase.ImageIndex プロパティで制御できます
public ImageList ImageList {get; set;}
public int ImageIndex {get; set;}
イメージリストを追加した場合 Image プロパティは null に設定されます
using System.Windows.Forms;
using System.Drawing;

class WinMain : Form {
        public static void Main(string[] args) {
                Application.Run(new WinMain());
        }

        public WinMain() {
                ImageList img = new ImageList();
                img.ImageSize = new Size(200 , 100);
                img.Images.Add(new Bitmap("test.jpg"));

                Button bt = new Button();
                bt.Size = img.ImageSize;
                bt.ImageList = img;
                bt.ImageIndex = 0;
                Controls.Add(bt);
        }
}
このプログラムは、先ほどのプログラムのようにボタンにイメージを表示しますが
イメージリストを使って表示している点で異なっています
イベントに応じてボタンのイメージを変更するような場合、この方が便利でしょう
通常、ボタンのテキストは中央に配置されますが
必要に応じて、ボタンのテキストの位置を変更することができます
テキストの位置を設定するには ButtonBase.TextAlign プロパティを使います
public virtual ContentAlignment TextAlign {get; set;}
このプロパティには ImageAlign プロパティ同様に
位置を示す ContentAlignment 列挙型メンバを指定します
using System.Windows.Forms;
using System.Drawing;

class WinMain : Form {
	public static void Main(string[] args) {
		Application.Run(new WinMain());
	}

	public WinMain() {
		Button bt = new Button();
		bt.Size = new Size(200 , 30);
		bt.Text = "Kitty on your lap";
		bt.TextAlign = ContentAlignment.MiddleLeft;
		Controls.Add(bt);
	}
}
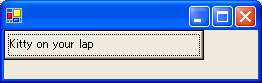
図を見れば、テキストが左寄りになっていることがわかると思います
これは TextAlign プロパティを変更した結果です