パス
ベクタグラフィックスの情報
図形を描くという、極めて単純なグラフィックス処理であれば
ピクセル単位で保存しなくても、手順さえ保存すればそれを再生することができます
Win32 API のメタファイルを知っている方は、よく理解しているでしょう
図形の情報は、ビットマップのようなイメージとは異なり
単純に、呼び出すべきメソッドと座標のデータさえあれば再現することができます
これを管理するのがパスと呼ばれるもので、図の情報を保持します
すなわち、パスとは図形のコレクションであると考えることができます
パスは System.Drawing.Drawing2D.GraphicsPath クラスで表現されます
Object
   MarshalByRefObject
      GraphicsPath

public sealed class GraphicsPath :
	MarshalByRefObject, ICloneable, IDisposable
このクラスのコンストラクタは以下のように定義されています
public GraphicsPath();
public GraphicsPath(FillMode fillMode);
public GraphicsPath(Point[] pts , byte[] types);
public GraphicsPath(PointF[] pts , byte[] types);
public GraphicsPath(Point[] pts , byte[] types , FillMode fillMode);
public GraphicsPath(PointF[] pts , byte[] types , FillMode fillMode);
fillMode には、このパスの塗りつぶしモードを指定します
pts には、パスの各頂点の座標を格納した構造体配列を指定します
types は、pts で指定した各頂点の型を表す PathPointType の配列です
types で指定するのは、byte 型を表していますが
System.Drawing.Drawing2D.PathPointType 列挙型のメンバの配列です
public enum PathPointType
この列挙型は、以下のようなメンバを定義しています
これらで分けられる各図形の部品をセグメントと呼びます
| メンバ | 解説
|
|---|
| Bezier | ベジェ曲線を示す
|
| Bezier3 | 3次ベジェ曲線を示す
|
| CloseSubpath | サブパスの終点を示す
|
| DashMode | 対応する部分がダッシュすることを示す
|
| Line | 線を示す
|
| PathMarker | パスマーカーを示す
|
| PathTypeMask | マスクポイントを示す
|
| Start | GraphicsPath の出発点を示す
|
これらの機能を用いれば、頂点の配列から図形を定義することができます
重要なのは、パスを作成した時点では実際に描画されることはないので
メモリ上に図形の情報を配置し、後でそれを一度に呼び出すことができるのです
これは、ダブルバッファリングに考え方が似ているかもしれません
パスを定義すれば、後は描画するだけでパスに保存された図形を表示できます
パスを描画するには Graphics.DrawPath() メソッドを使用します
public void DrawPath(Pen pen , GraphicsPath path);
pen には、描画する時に使う Pen オブジェクトを
path には、描画するパスを指定します
using System.Windows.Forms;
using System.Drawing;
using System.Drawing.Drawing2D;

class WinMain : Form {
	public static void Main(string[] args) {
		Application.Run(new WinMain());
	}
	override protected void OnPaint(PaintEventArgs e) {
		Graphics g = e.Graphics;
		Point[] pt = {
			new Point(0 , 50) , new Point(75 , 100) ,
			new Point(140 , 0) , new Point(200 , 50)
		};
		byte[] bt = {
			(byte)PathPointType.Bezier , (byte)PathPointType.Bezier ,
			(byte)PathPointType.Bezier , (byte)PathPointType.Bezier
		};
		GraphicsPath gp = new GraphicsPath(pt , bt);

		g.DrawPath(Pens.Blue , gp);
	}
}
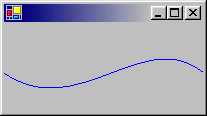
結果を見てわかるように、GraphicsPath で指定した各頂点に対して
ベジェ曲線として用いるように PathPointType 列挙型のメンバで指定しています
これを、DrawPath() メソッドで、最後に描画しているのです
さらに、コンストラクタによって生成した GraphicsPath のインスタンスには
様々な図形加算メソッドによって、図形を追加することができます
このメソッドは、Graphics クラスで描画に用いるメソッドに極めて形が似ています
線を追加するには GraphicsPath.AddLine() メソッドを使います
public void AddLine(Point pt1 , Point pt2);
public void AddLine(PointF pt1 , PointF pt2);
public void AddLine(int x1 , int y1 , int x2 , int y2);
public void AddLine(float x1 , float y1 , float x2 , float y2);
pt1 には開始座標を、pt2 には終点座標をそれぞれ指定します
x1 と y1 は開始座標の X 座標と Y 座標を
x2 と y 2 には終点座標となる X 座標と Y 座標を指定します
複数の線ならば GraphicsPath.AddLines() メソッドを使えます
public void AddLines(Point[] points);
public void AddLines(PointF[] points);
points には、各線の座標を示す構造体の配列を指定します
これらの考え方は、基本的に Graphics クラスの描画メソッドと同じです
円弧を追加する場合は GraphicsPath.AddEllipse() メソッドを使います
public void AddEllipse(Rectangle rect);
public void AddEllipse(RectangleF rect);
public void AddEllipse(int x , int y , int width , int height);
public void AddEllipse(float x , float y , float width , float height);
rect には、円弧が外接する長方形を示す構造体を
x と y には、長方形の左上かどの座標、width と height には幅と高さを指定します
もちろん、長方形の追加も可能です
長方形の追加は GraphicsPath.AddRectangle() メソッドを使います
public void AddRectangle(Rectangle rect);
public void AddRectangle(RectangleF rect);
rect には長方形の位置と大きさを示す構造体を指定します
複数の長方形を同時に追加する GraphicsPath.AddRectangles() もあります
public void AddRectangles(Rectangle[] rects);
public void AddRectangles(RectangleF[] rects);
rects には、追加する長方形の情報が格納される構造体の配列を指定します
配列に格納されている長方形は、全て追加されます
using System.Windows.Forms;
using System.Drawing;
using System.Drawing.Drawing2D;

class WinMain : Form {
	public static void Main(string[] args) {
		Application.Run(new WinMain());
	}
	override protected void OnPaint(PaintEventArgs e) {
		Graphics g = e.Graphics;
		GraphicsPath gp = new GraphicsPath();

		gp.AddEllipse(0 , 0 , 400 , 100);
		gp.AddLine(0 , 50 , 400 , 50);
		gp.AddRectangle(new Rectangle(50 , 10 , 250 , 80));
		g.DrawPath(Pens.Blue , gp);
	}
}
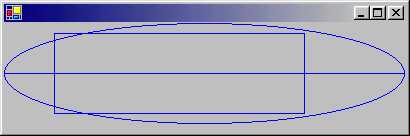
このプログラムは、空のパスを最初に生成し
これに、Add*() メソッドで円弧、線、長方形を追加しています
さらに、より複雑な図形を追加することもできます
曲線を追加する場合は GraphicsPath.AddBezier() メソッドを用います
public void AddBezier(
	Point pt1 , Point pt2 , Point pt3 , Point pt4
);
public void AddBezier(
	PointF pt1 , PointF pt2 , PointF pt3 , PointF pt4
);
public void AddBezier(
	int x1 , int y1 , int x2 , int y2 ,
	int x3 , int y3 , int x4 , int y4
);
public void AddBezier(
	float x1 , float y1 , float x2 , float y2 ,
	float x3 , float y3 , float x4 , float y4
);
pt1 には、曲線の開始点を示す座標を
pt2 と pt3 にはベジェ曲線の制御点を表す座標を
pt4 には、曲線の終点を示す座標を、それぞれ構造体で指定します
同様に、x1 と y1 には、ぞれぞれ開始点を示す X 座標と Y 座標を
x2、y2 と x3、y3 には、曲線の制御点を表す座標を
x4 と y4 には、曲線の終点を示す座標を指定してます
複数のベジェ曲線を一度に追加する場合は
GraphicsPath.AddBeziers を使います
public void AddBeziers(Point[] points);
public void AddBeziers(PointF[] points);
points には、ベジェ曲線の各点を表す座標の配列を指定します
スプライン曲線を追加するには GraphicsPath.AddCurve() を使います
public void AddCurve(Point[] points);
public void AddCurve(PointF[] points);
public void AddCurve(Point[] points , float tension);
public void AddCurve(PointF[] points , float tension);

public void AddCurve(
	Point[] points , int offset ,
	int numberOfSegments , float tension
);
public void AddCurve(
	Point[] points , int offset ,
	int numberOfSegments , float tension
);
points には曲線を定義する点の配列を指定します
tension は、線を曲げる強さを指定する値です
offset には、曲線に最初に使われる配列の要素のインデックスを
numberOfSegments には offset から数えて、使用する要素の数を指定します
閉じたスプライン曲線を描きたい場合は
GraphicsPath.AddClosedCurve() メソッドを用いてください
public void AddClosedCurve(Point[] points);
public void AddClosedCurve(PointF[] points);
public void AddClosedCurve(Point[] points , float tension);
public void AddClosedCurve(Point[] points , float tension);
points には、曲線を定義する点の配列を
tension には、線を曲げる強さを指定する値を指定します
using System.Windows.Forms;
using System.Drawing;
using System.Drawing.Drawing2D;

class WinMain : Form {
	public static void Main(string[] args) {
		Application.Run(new WinMain());
	}
	override protected void OnPaint(PaintEventArgs e) {
		Graphics g = e.Graphics;
		GraphicsPath gp = new GraphicsPath();
		Point[] pt = {
			new Point(0 , 200) , new Point(100 , 0) ,
			new Point(200 , 100) , new Point(300 , 0)
		};
		gp.AddBezier(0 , 0 , 100 , 200 , 200 , 0 , 300 , 200);
		gp.AddCurve(pt);

		g.DrawPath(Pens.Blue , gp);
	}
}
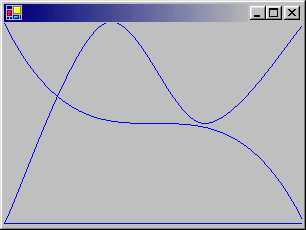
このプログラムは、パスに曲線を追加しています
この他には、まだ Pie や Arc、Polygon などの図形がありますね
もちろん、これらの図形もパスでサポートされています
円は GraphicsPath.AddArc() メソッドで追加できます
public void AddArc(
	Rectangle rect , float startAngle , float sweepAngle
);
public void AddArc(
	RectangleF rect , float startAngle , float sweepAngle
);
public void AddArc(
	int x , int y , int width , int height ,
	float startAngle , float sweepAngle
);
public void AddArc(
	float x , float y , float width , float height ,
	float startAngle , float sweepAngle
);
rect には、円の大きさを定義する長方形を
startAngle は円の開始角度、sweepAngle は終了角度を指定します
x と y には、円の外接する長方形の左上角の X 座標と Y 座標を
width と height には幅と高さを指定します
同様に、閉じた円は GraphicsPath.AddPie() メソッドで追加できます
public void AddPie(
	Rectangle rect , float startAngle , float sweepAngle
);
public void AddPie(
	int x , int y , int width , int height ,
	float startAngle , float sweepAngle
);
public void AddPie(
	float x , float y , float width , float height ,
	float startAngle , float sweepAngle
);
パラメータの意味は、AddArc() メソッドと同じなので省略します
また、ポリゴンは GraphicsPath.AddPolygon() メソッドを使います
public void AddPolygon(Point[] points);
public void AddPolygon(PointF[] points);
points には、多角形の各頂点の情報を持つオブジェクトを指定します
using System.Windows.Forms;
using System.Drawing;
using System.Drawing.Drawing2D;

class WinMain : Form {
	public static void Main(string[] args) {
		Application.Run(new WinMain());
	}
	override protected void OnPaint(PaintEventArgs e) {
		Graphics g = e.Graphics;
		GraphicsPath gp = new GraphicsPath();
		Rectangle rect = new Rectangle(10 , 10 , 200 , 200);

		gp.AddArc(rect , 0 , -200);
		rect.X += 210;
		gp.AddPie(rect , 0 , 270);

		g.DrawPath(Pens.Blue , gp);
	}
}
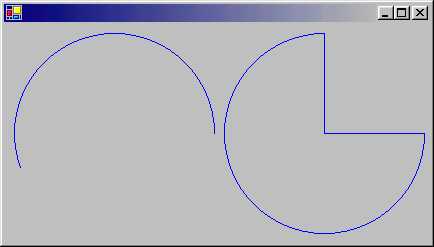
特に説明は必要ないでしょう
AddArc() メソッドと AddPie() メソッドを使って円をパスに追加しています
この他にも、実は文字列の追加も可能になっています
これは GraphicsPath.AddString() メソッドで行うことができます
文字列のパスへの追加は、ちょっと面白いグラフィックス表現になります
public void AddString(
	string s , FontFamily family , int style , float emSize ,
	Point origin , StringFormat format
);
public void AddString(
	string s , FontFamily family , int style , float emSize ,
	PointF origin , StringFormat format
);
public void AddString(
	string s , FontFamily family , int style , float emSize ,
	Rectangle layoutRect , StringFormat format
);
public void AddString(
	string s , FontFamily family , int style , float emSize ,
	RectangleF layoutRect , StringFormat format
);
s には追加する文字列を、family にはフォントを表す FontFamily を指定します
style は int 型になっていますが、FontStyle 列挙型のメンバを指定します
emSize はフォントサイズ、origin は文字列の座標を指定します
format には文字列レイアウト情報を持つ StringFormat オブジェクトを
layoutRect には、文字列を描画する長方形を指定します
using System.Windows.Forms;
using System.Drawing;
using System.Drawing.Drawing2D;

class WinMain : Form {
	public static void Main(string[] args) {
		Application.Run(new WinMain());
	}
	override protected void OnPaint(PaintEventArgs e) {
		Graphics g = e.Graphics;
		GraphicsPath gp = new GraphicsPath();
		Point pt = new Point(0 , 0);
		FontFamily ff = new FontFamily("Balmoral LET");

		gp.AddString("Kitty on your lap" , ff , (int)FontStyle.Bold , 120 , pt ,
			new StringFormat(StringFormatFlags.DisplayFormatControl)
		);
		g.DrawPath(Pens.Black , gp);
	}
}
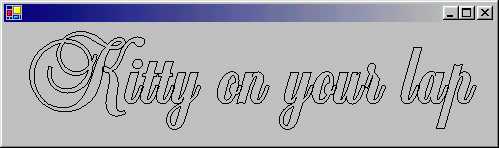
どうでしょう、パスは輪郭しかなぞらないため
フォントの輪郭だけがペンでなぞられ、中身は切りぬかれています
これは、普通に文字列を描画するだけでは得られない効果です
最後に、パスは図形の内部を塗りつぶすこともできます
塗りつぶしには Graphics.FillPath() メソッドを用います
public void FillPath(Brush brush , GraphicsPath path);
brush には Brush オブジェクトを、path には塗りつぶすパスを指定します
using System.Windows.Forms;
using System.Drawing;
using System.Drawing.Drawing2D;

class WinMain : Form {
	public static void Main(string[] args) {
		Application.Run(new WinMain());
	}
	override protected void OnPaint(PaintEventArgs e) {
		Graphics g = e.Graphics;
		GraphicsPath gp = new GraphicsPath();
		Point pt = new Point(0 , 0);
		FontFamily ff = new FontFamily("Balmoral LET");

		Brush myBrush = new LinearGradientBrush(
			new Rectangle(0 , 0 , 600 , 120) ,
			Color.FromArgb(0xFF , 0 , 0) , Color.FromArgb(0 , 0 , 0) ,
			90.0f
		);

		gp.AddString("Kitty on your lap" , ff , (int)FontStyle.Bold , 120 , pt ,
			new StringFormat(StringFormatFlags.DisplayFormatControl)
		);
		g.FillPath(myBrush , gp);
	}
}
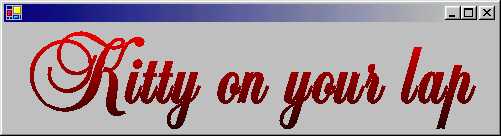
このプログラムは、パスを使ってフォントの塗りつぶしにブラシを用いています
DrawPath() と合わせれば、フォントの枠と内部の描画を分けることができます
このように、パスはより複雑な図形を組み合わせによって作成することができるのです